基于 FRRouting/Bird 配置多虚拟机之间的 OSPF 组网(建邻、路由交换),并实现多路径负载均衡。
概述
FRRouting、Bird 都是常用的开源路由软件,支持 OSPF 协议。本文采用 FRRouting 作为两台 DNS Server 的路由发布器,Bird 作为 DR 兼 Client 的路由软件(在实际测试环境中,可以使用其中任一款软件来实现 OSPF 的组网),通过 FRRouting 发布 VIP,实现 OSPF 场景下的多路径负载均衡。
环境准备
1、创建三台虚拟机,每台虚拟机至少有一张可用的网卡
安装 Linux 虚拟机,本文安装了三台 Ubuntu 24.04.1,安装过程参考 Mac安装虚拟机
2、在其中一台虚拟机上安装 bird
1 | sudo apt install bird2 |
3、在另外两台虚拟机上安装 FRRouting 以及 Coredns
1 | sudo apt install frr |
Coredns 下载
1 | wget https://github.com/coredns/coredns/releases/download/v1.12.0/coredns_1.12.0_linux_arm64.tgz |
1 | coredns --version |
OSPF 建邻
目标:以 Bird 节点作为 DR,实现 3 台虚拟机的建邻组网。
FRRouting 配置 OSPF
开启 ospfd 进程
修改 daemons 文件,默认位置在
/etc/frr/daemons,将 ospfd 开关打开1
ospfd=yes
重启 FRR,查看 ospfd 进程是否正常启动
1
systemctl restart frr
1
2
3
4
5
6
7
8
9
10
11
12
13
14
15
16
17
18
19
20
21
22
23
24
25
26
27
28root@ubuntu2:~$ systemctl status frr
● frr.service - FRRouting
Loaded: loaded (/etc/systemd/system/frr.service; enabled; preset: enabled)
Active: active (running) since Sun 2024-12-08 16:47:09 UTC; 5s ago
Docs: https://frrouting.readthedocs.io/en/latest/setup.html
Process: 39653 ExecStart=/usr/lib/frr/frrinit.sh start (code=exited, status=0/SUCCESS)
Main PID: 39664 (watchfrr)
Status: "FRR Operational"
Tasks: 10 (limit: 4550)
Memory: 18.6M (peak: 32.1M)
CPU: 117ms
CGroup: /system.slice/frr.service
├─39664 /usr/lib/frr/watchfrr -d -F traditional zebra mgmtd ospfd staticd
├─39676 /usr/lib/frr/zebra -d -F traditional -A 127.0.0.1 -s 90000000
├─39681 /usr/lib/frr/mgmtd -d -F traditional -A 127.0.0.1
├─39683 /usr/lib/frr/ospfd -d -F traditional -A 127.0.0.1
└─39686 /usr/lib/frr/staticd -d -F traditional -A 127.0.0.1
Dec 08 16:47:09 ubuntu2 frrinit.sh[39693]: [39693|ospfd] done
Dec 08 16:47:09 ubuntu2 staticd[39686]: [VTVCM-Y2NW3] Configuration Read in Took: 00:00:00
Dec 08 16:47:09 ubuntu2 frrinit.sh[39706]: [39706|staticd] done
Dec 08 16:47:09 ubuntu2 watchfrr[39664]: [QDG3Y-BY5TN] zebra state -> up : connect succeeded
Dec 08 16:47:09 ubuntu2 frrinit.sh[39653]: * Started watchfrr
Dec 08 16:47:09 ubuntu2 watchfrr[39664]: [QDG3Y-BY5TN] mgmtd state -> up : connect succeeded
Dec 08 16:47:09 ubuntu2 watchfrr[39664]: [QDG3Y-BY5TN] ospfd state -> up : connect succeeded
Dec 08 16:47:09 ubuntu2 watchfrr[39664]: [QDG3Y-BY5TN] staticd state -> up : connect succeeded
Dec 08 16:47:09 ubuntu2 watchfrr[39664]: [KWE5Q-QNGFC] all daemons up, doing startup-complete notify
Dec 08 16:47:09 ubuntu2 systemd[1]: Started frr.service - FRRouting.
FRR 配置
该 FRR 节点网卡信息
1 | guoyi@ubuntu2:~$ ip a |
使用 ens160 网卡作为 OSPF 网卡
1 | ! |
ip ospf area 0.0.0.0- 将该网卡配置为 OSPF 网卡,并设置 area 为
0.0.0.0 - 也可在
router ospf下配置network 172.16.19.0/24 area 0.0.0.0,但此配置会将所有该网段的网卡设置为 OSPF 网卡
- 将该网卡配置为 OSPF 网卡,并设置 area 为
ip ospf dead-interval 20、ip ospf hello-interval 5- 设置 hello 和 dead 的时间间隔
- 需建邻的所有节点这两个配置需相同
ip ospf priority 0- 此节点不竞选 DR/BDR
ospf router-id 172.16.19.131- area 内该 OSPF 节点的唯一标识,一般用网卡 IP 来表示
Bird 配置 OSPF
使用 ens256 网卡作为 OSPF 网卡
1 | protocol ospf v2 { |
priority 1- 参与竞选,且优先级最高
查看建邻
BIRD 节点作为 DR,查看其他的节点状态,均建邻成功(Full)
1 | bird> show ospf neighbors |
FRRouting 节点作为 Other,只需与 DR 节点建邻成功,Other 节点之间处于 2-Way 状态
1 | ubuntu2# show ip ospf neighbor |
非默认路由网卡建邻问题
使用非默认路由网卡作为 OSPF 网卡时,如开启严格的反向路由检查,收到的组播 224.0.0.5 的 hello 包会被 rp_filter 过滤掉,导致 ospfd 进程无法收到 hello 包,也就无法建邻。
解决方法:关闭或使用 loose 的反向路由检查。详细参考:rp_filter反向路由过滤
OSPF 多路径负载均衡
OSPF 支持多路径的负载均衡,如两台 DNS Server,使用同样的 VIP,通过 OSPF 路由可以实现流量的负载均衡。
FRRouting 发布 VIP
添加并开启虚拟网卡 vip_if0
1 | sudo ip link add vip_if0 type dummy |
FRR 配置 vip_if0 网卡
1 | ! |
ip address 10.0.0.10/32- 添加
10.0.0.10/32作为 VIP
- 添加
ip ospf area 0.0.0.0- 设置 vip_if0 为 OSPF 网卡,但此虚拟网卡实际无法建邻
BIRD 添加路由
检查 BIRD 配置是否支持路由导出以及多路径路由
确认 BIRD 开启将学到的路由导出到内核路由表,确认
export all;开启1
2
3
4
5
6
7
8
9protocol kernel {
ipv4 { # Connect protocol to IPv4 table by channel
# table master4; # Default IPv4 table is master4
# import all; # Import to table, default is import all
export all; # Export to protocol. default is export none
};
# learn; # Learn alien routes from the kernel
# kernel table 10; # Kernel table to synchronize with (default: main)
}确认 OSPF 开启 ecmp,以支持 OSPF 多路径。ecmp 默认(不填写)为开启状态,limit 默认 16
1
2
3protocol ospf v2 {
ecmp <switch> [limit <num>];
}
查看 BIRD 是否学习到 VIP 路由,可以看到已经学习到了该 VIP 的两条路由
1 | bird> show route |
查看是否导入到了 Linux 路由表
1 | root@ubuntu2404:/home/guoyi/workplace# ip route show |
配置并运行 Coredns
添加 Coredns 配置及域名解析
/etc/coredns/Corefile
1
2
3
4example.com {
log
file /etc/coredns/db.example.com
}/etc/coredns/db.example.com
1
2
3
4
5
6
7
8
9
10
11$TTL 3600
@ IN SOA ns.example.com. admin.example.com. (
1 ; Serial
3600 ; Refresh
1800 ; Retry
604800 ; Expire
86400 ) ; Minimum TTL
@ IN NS ns.example.com.
@ IN A 192.168.1.10
ns IN A 192.168.1.10停止 systemd-resolve
1
systemctl stop systemd-resolved
运行 Coredns
1
coredns -conf /etc/coredns/Corefile
检查 Coredns 是否正常
1
2
3
4
5
6
7
8
9
10
11
12
13
14
15
16
17
18
19
20
21
22
23
24
25
26guoyi@ubuntu2:~$ dig @127.0.0.1 example.com
; <<>> DiG 9.18.28-0ubuntu0.24.04.1-Ubuntu <<>> @127.0.0.1 example.com
; (1 server found)
;; global options: +cmd
;; Got answer:
;; ->>HEADER<<- opcode: QUERY, status: NOERROR, id: 45115
;; flags: qr aa rd; QUERY: 1, ANSWER: 1, AUTHORITY: 1, ADDITIONAL: 1
;; WARNING: recursion requested but not available
;; OPT PSEUDOSECTION:
; EDNS: version: 0, flags:; udp: 1232
; COOKIE: a29f8e8fa133c213 (echoed)
;; QUESTION SECTION:
;example.com. IN A
;; ANSWER SECTION:
example.com. 3600 IN A 192.168.1.10
;; AUTHORITY SECTION:
example.com. 3600 IN NS ns.example.com.
;; Query time: 0 msec
;; SERVER: 127.0.0.1#53(127.0.0.1) (UDP)
;; WHEN: Mon Dec 09 12:50:07 UTC 2024
;; MSG SIZE rcvd: 118
打流
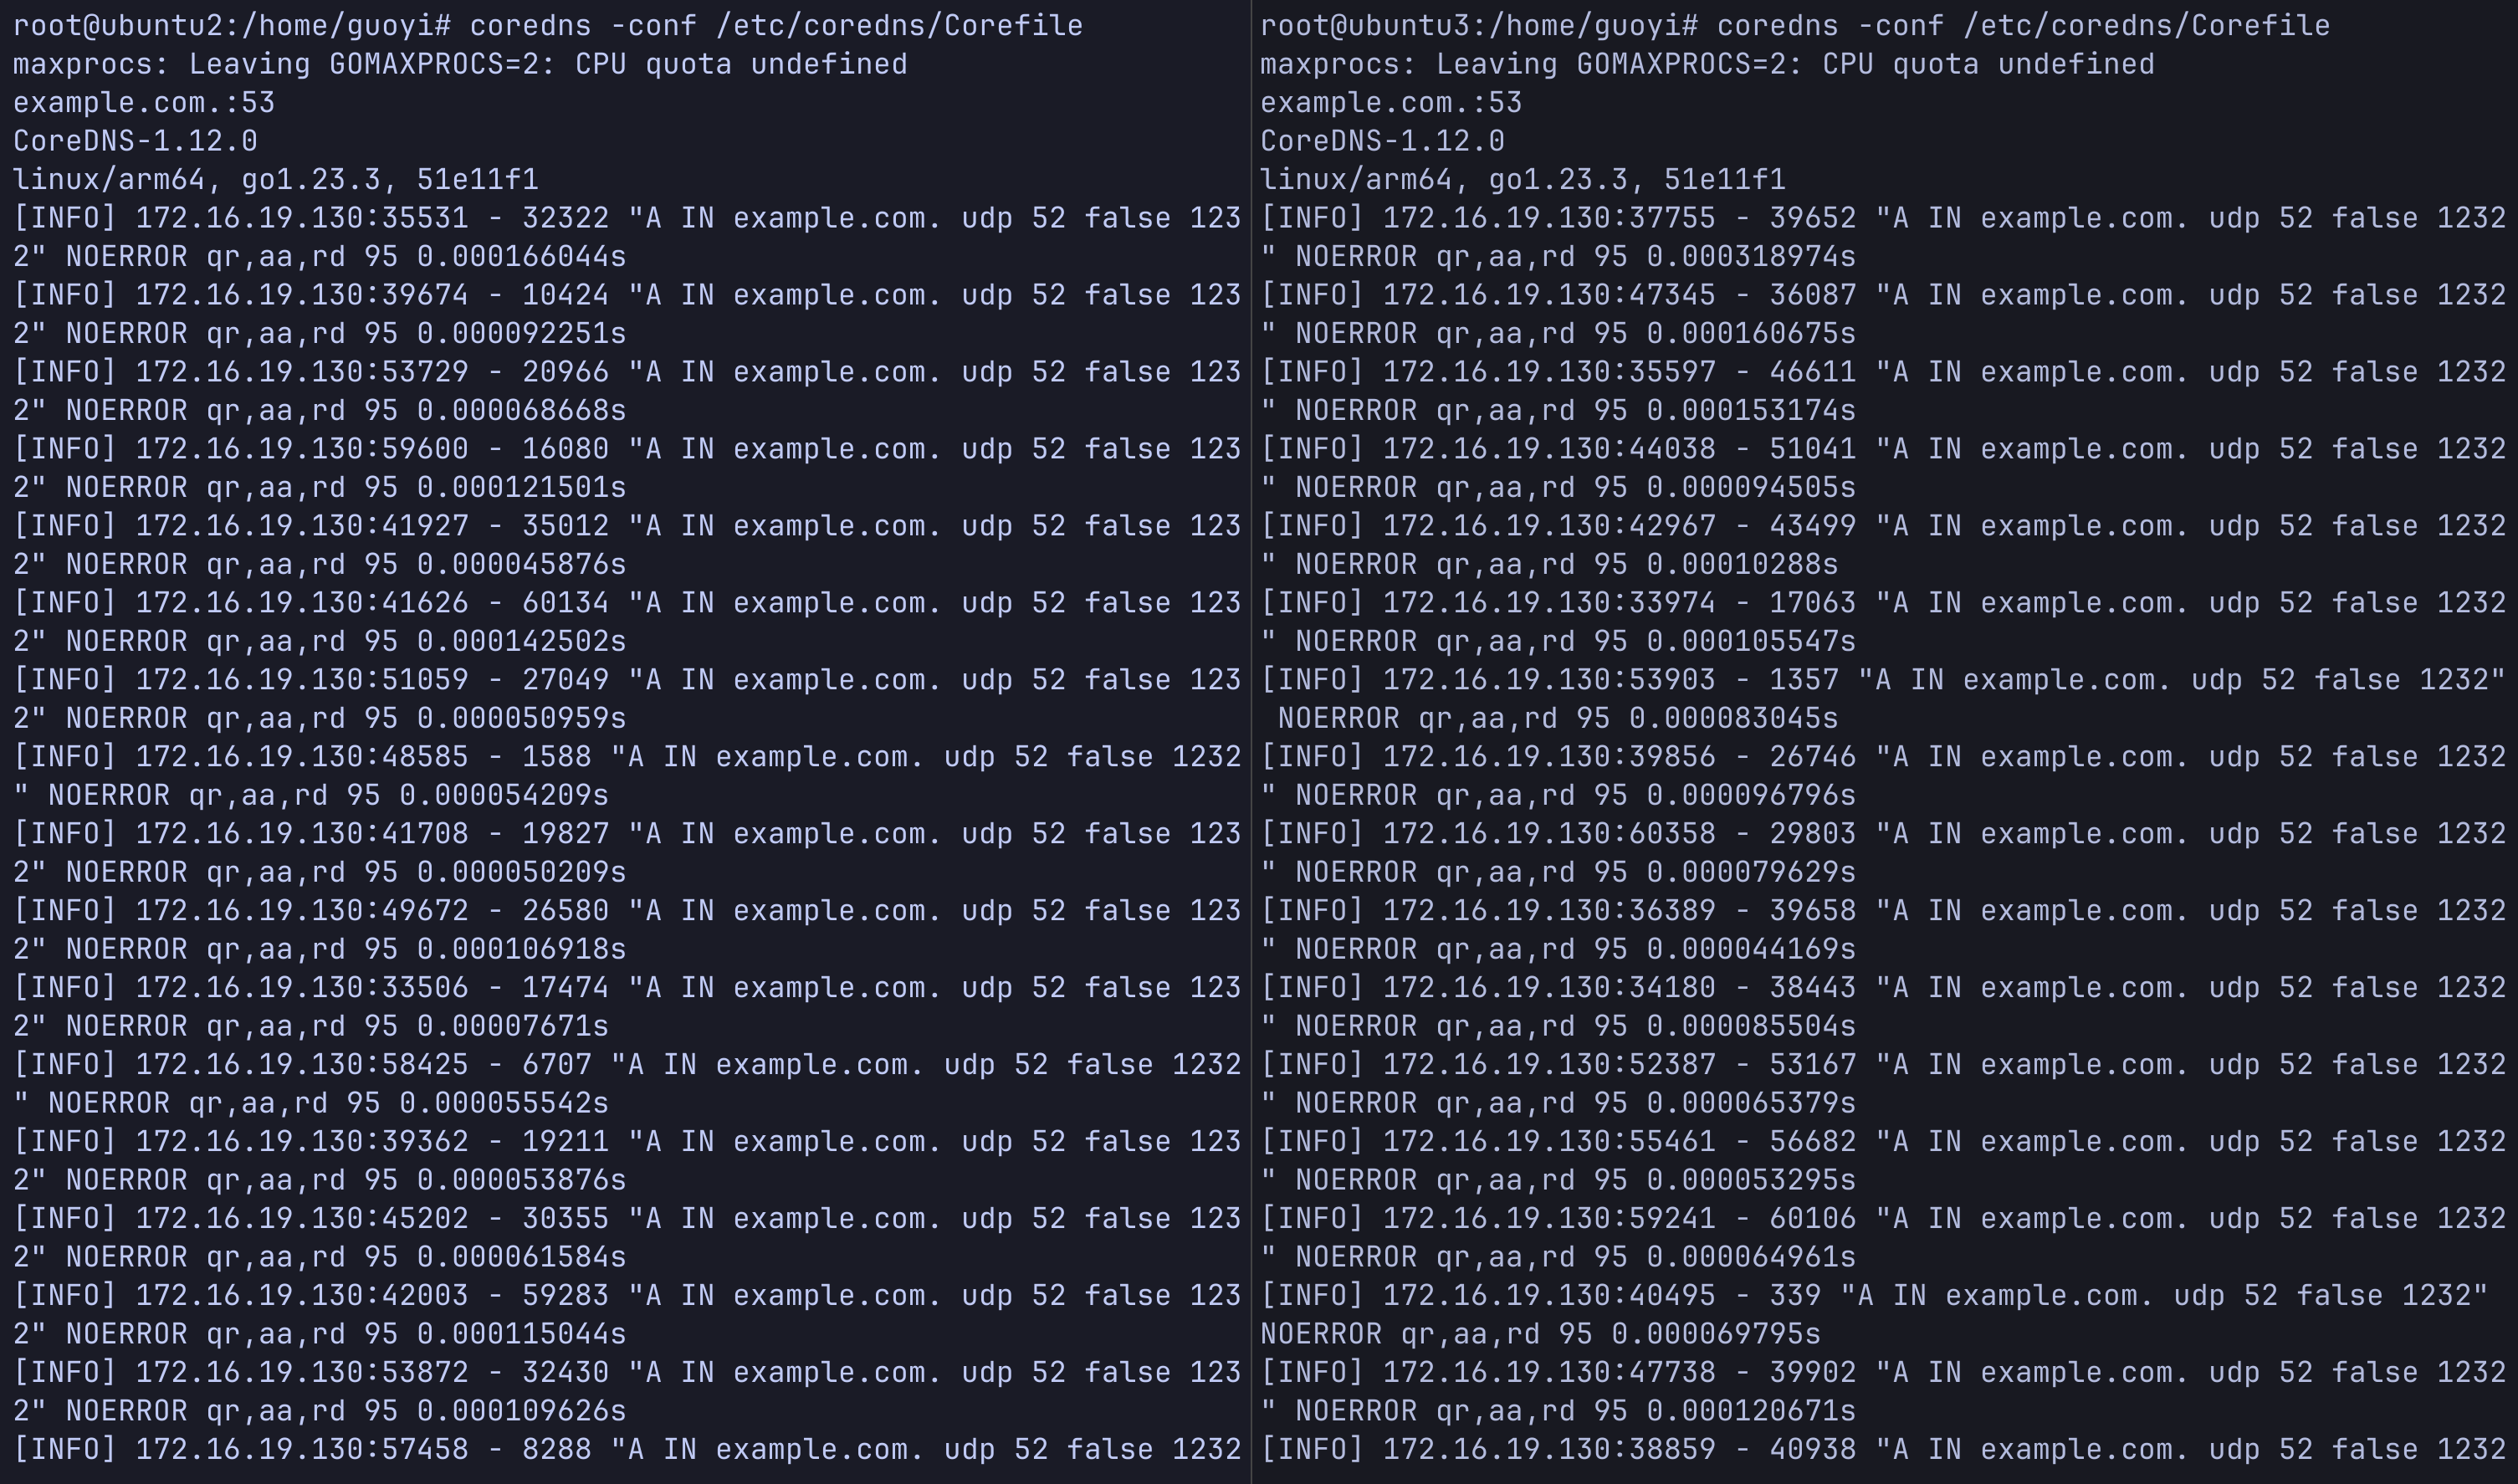
在 BIRD 节点通过 dig VIP 打流,查看两个 Coredns 服务器日志是否负载均衡承接流量。
打流前先确认 BIRD 节点内核配置
net.ipv4.fib_multipath_hash_policy1
sysctl -a | grep net.ipv4.fib_multipath_hash_policy
该配置设置了多路径路由哈希策略,相同元组的包在多路径下会选择同一路径
net.ipv4.fib_multipath_hash_policy=0:{src_ip, dst_ip}net.ipv4.fib_multipath_hash_policy=1:{src_ip, src_port , dst_ip, dst_port, proto}
需将
net.ipv4.fib_multipath_hash_policy设置为 11
sysctl -w net.ipv4.fib_multipath_hash_policy=1
在 BIRD 节点打流到 VIP
1
for i in {1..1000}; do dig @10.0.0.10 example.com; done
查看两个 Coredns 节点日志,可以看到两节点平分了 VIP 的流量
